Rent a server, wait ten minutes, and read its login log. Someone is already guessing passwords. It isn’t someone who knows you. It’s a bot that visits every address on the internet and tries root, admin and ubuntu on any machine that answers.
Logins aren’t the only target. In a reply to a post by levelsio, someone described leaving a Redis database open on a Hetzner server for a few minutes. When they came back, a crypto miner was using half the CPU.
This article explains the setup levelsio shared in that post. It drops one rule that does nothing and covers the mistakes that undo the rest.
Why a VPS is exposed
Your laptop at home sits behind a router. The router ignores anyone on the internet who knocks without being invited, so your laptop is hidden by default.
A VPS has no router. It has a public address, and anyone can reach every program listening on it.
Each of those programs listens on a numbered port. Think of ports as numbered doors on a building. Websites use ports 80 and 443. SSH, the remote login you use to manage the server, uses port 22. Databases have their own: 5432 for Postgres, 6379 for Redis. Every open port is a door facing the whole internet.
The usual fix, and why it fails
The usual advice is a guest list: allow SSH only from your own IP address. It works for about a week.
Then your internet provider changes your address, and you’re locked out of your own server. Your home, your phone and the café all have different addresses. Your automatic deploys from GitHub come from thousands of them. So the rule gets opened to everyone “just for now”, and it stays that way.
The guest list fails because it checks where you are. What you want is to check who you are, wherever you are.
The idea: two callers, nothing else
A server that hosts websites only needs to talk to two kinds of callers:
- Visitors, who want your websites. They reach the server only through Cloudflare.
- You and your robots (your laptop, your deploy jobs), who want SSH and admin dashboards. They reach the server only through Tailscale.
Everyone else gets nothing. Not an error, not a login prompt: silence.
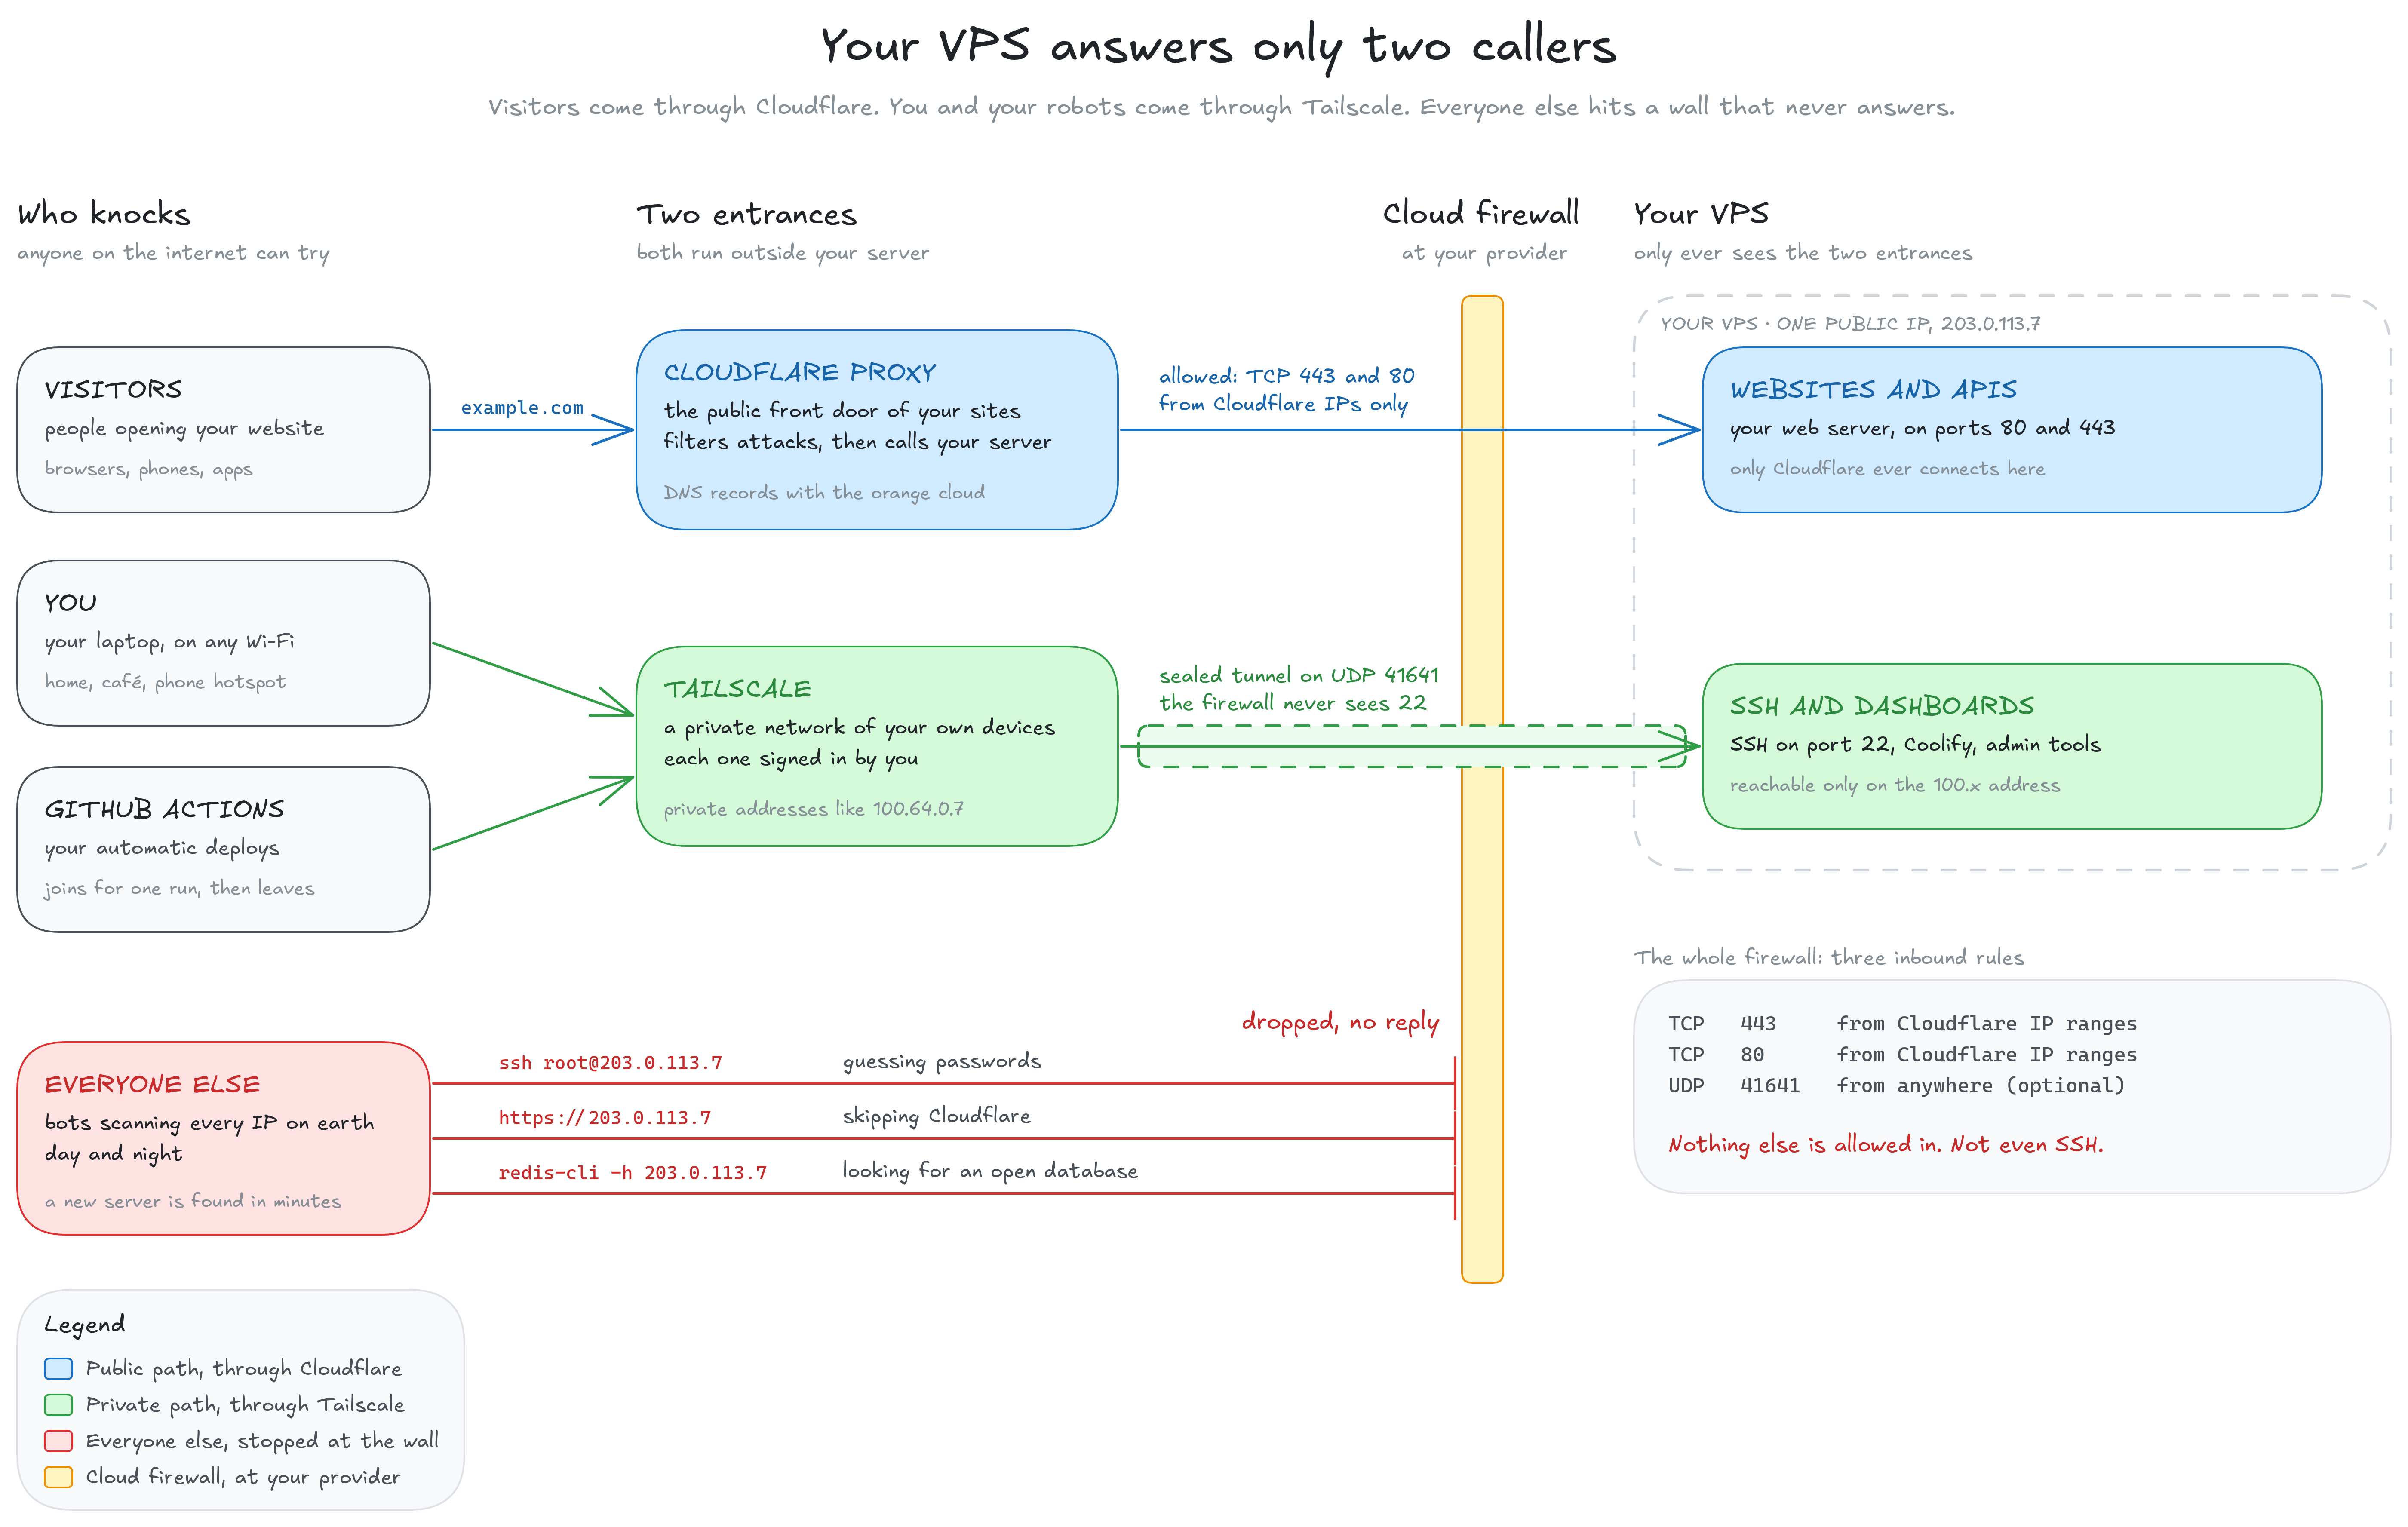
Three pieces make this work.
The cloud firewall is a filter your hosting provider runs in front of your server, inside their own network. Hetzner, DigitalOcean, AWS and most other providers offer one for free. When a packet doesn’t match any rule, the firewall drops it without answering. To a bot, your server looks switched off.
Cloudflare sits in front of your websites. Your domain points to Cloudflare, so visitors arrive at Cloudflare first. It filters out attacks and then forwards the request to your server. Your server only ever needs to accept connections from Cloudflare’s addresses, which Cloudflare publishes.
Tailscale builds a private network between your own devices: your laptop, your phone, your server. Each device joins by signing in to your account and gets a private address like 100.64.0.7. Traffic between devices is encrypted. It works on any Wi-Fi, because it checks who the device is, not where it is.
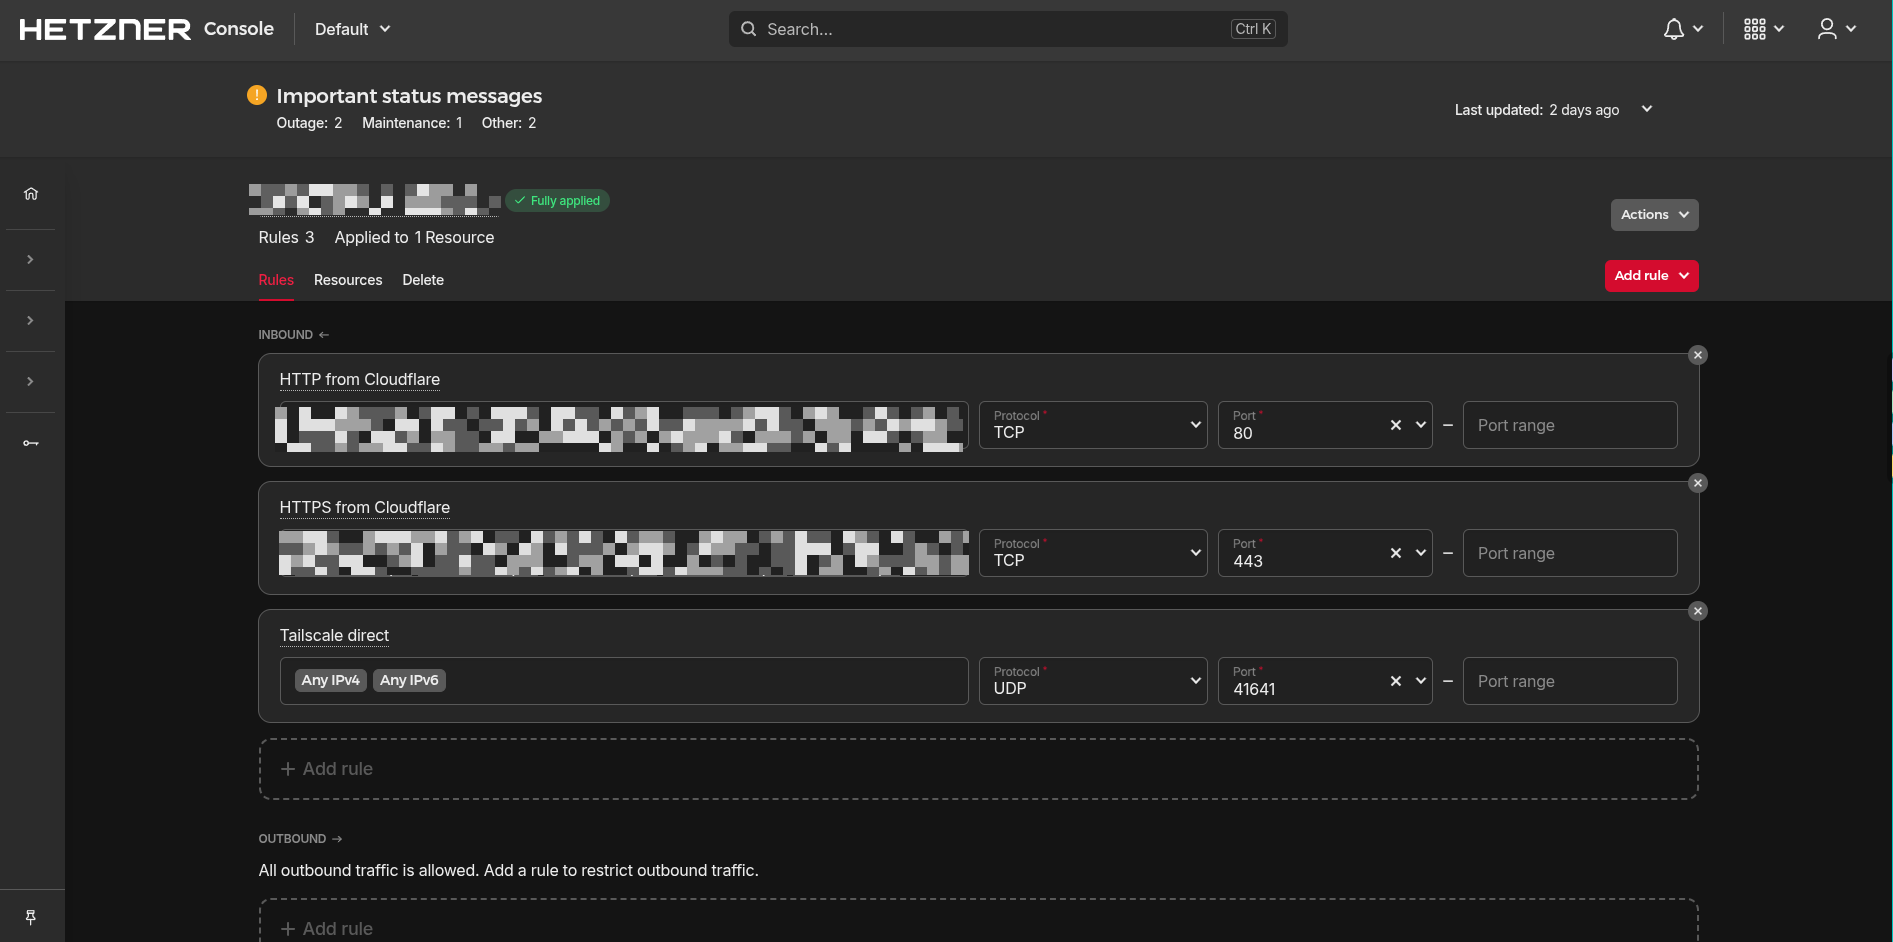
The whole firewall is three rules:
| Protocol | Port | Allowed from | Why |
|---|---|---|---|
| TCP | 443 | Cloudflare’s addresses | Your websites, over HTTPS |
| TCP | 80 | Cloudflare’s addresses | Redirects to HTTPS and certificate renewals |
| UDP | 41641 | Anywhere | Lets Tailscale connect directly (optional) |
There’s no rule for SSH. That’s the surprising part.
Why there’s no SSH rule
Levelsio’s post allows SSH only from the Tailscale address, and many guides say the same. It sounds right. But in a cloud firewall, that rule never matches anything.
Think of Tailscale as an envelope. When you type ssh [email protected], Tailscale takes your SSH traffic, encrypts it, and seals it inside an envelope addressed to your server’s public address on UDP port 41641. The firewall can only read the outside of the envelope. Port 22 and the 100.x address are written on the letter inside, where the firewall can’t see them.
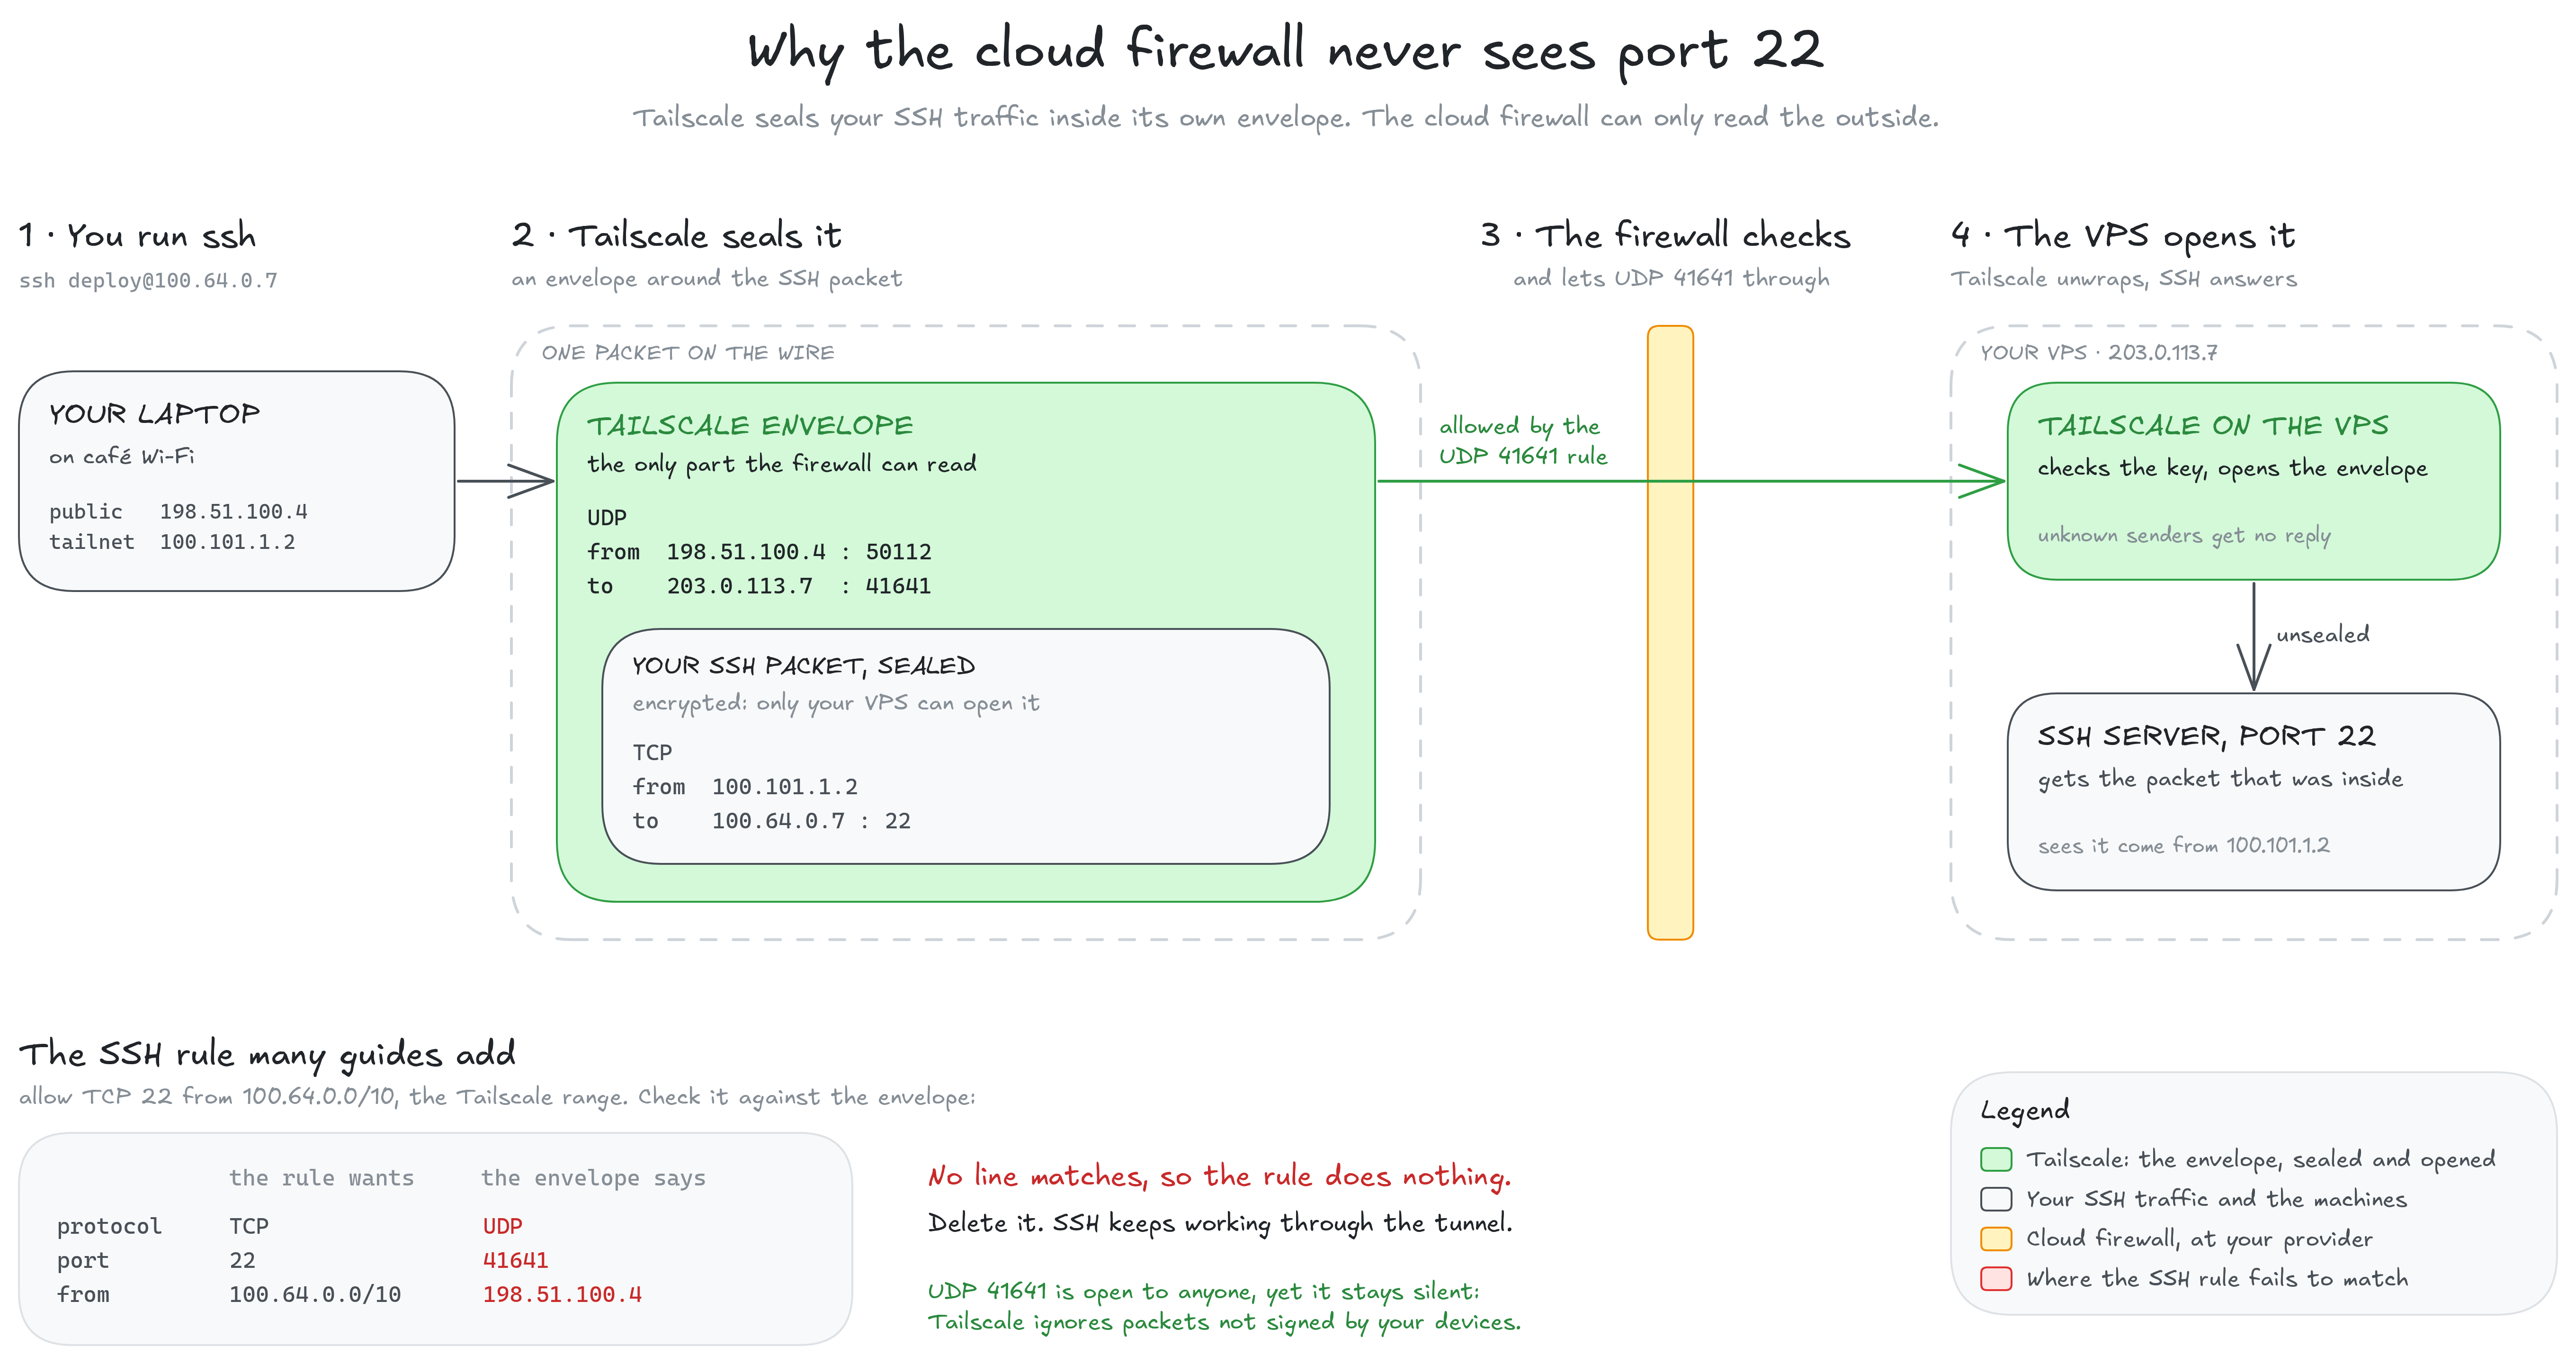
So a rule like “allow TCP 22 from 100.64.0.0/10” waits for something that never arrives. Delete it, and SSH keeps working.
Two questions usually come next:
- Isn’t UDP 41641, open to anyone, just another door? It’s open, but it never answers strangers. Tailscale ignores every packet that isn’t signed by one of your devices.
- What if I close 41641 as well? Tailscale still works. It finds another way in, through Tailscale’s relay servers if it has to. That’s slower, but still encrypted. The rule makes things faster; it isn’t required.
Setting it up
One rule matters more than any command: never close the old way in until the new way works. Keep one terminal connected to the server the whole time.
1. Create the firewall before the server. In your provider’s console, create a firewall with a single temporary rule: SSH (TCP 22) from your current IP. Attach it when you create the server. Everything else is already blocked, because the firewall has no rule for it. On Hetzner, outgoing traffic stays allowed.
Also set a root password through the provider’s web console and keep it in your password manager. It’s your emergency way in.
2. Install Tailscale on your laptop and on the server. Sign in with the same account on both. On the server:
The second command prints a link. Open it to sign the server in. --accept-dns=false leaves the server’s DNS settings alone, so nothing else on the server changes.
Then, in the Tailscale admin console, open the server’s menu and choose Disable key expiry. By default, Tailscale asks every device to sign in again after 180 days. For a server you can only reach through Tailscale, that’s a lockout on a timer.
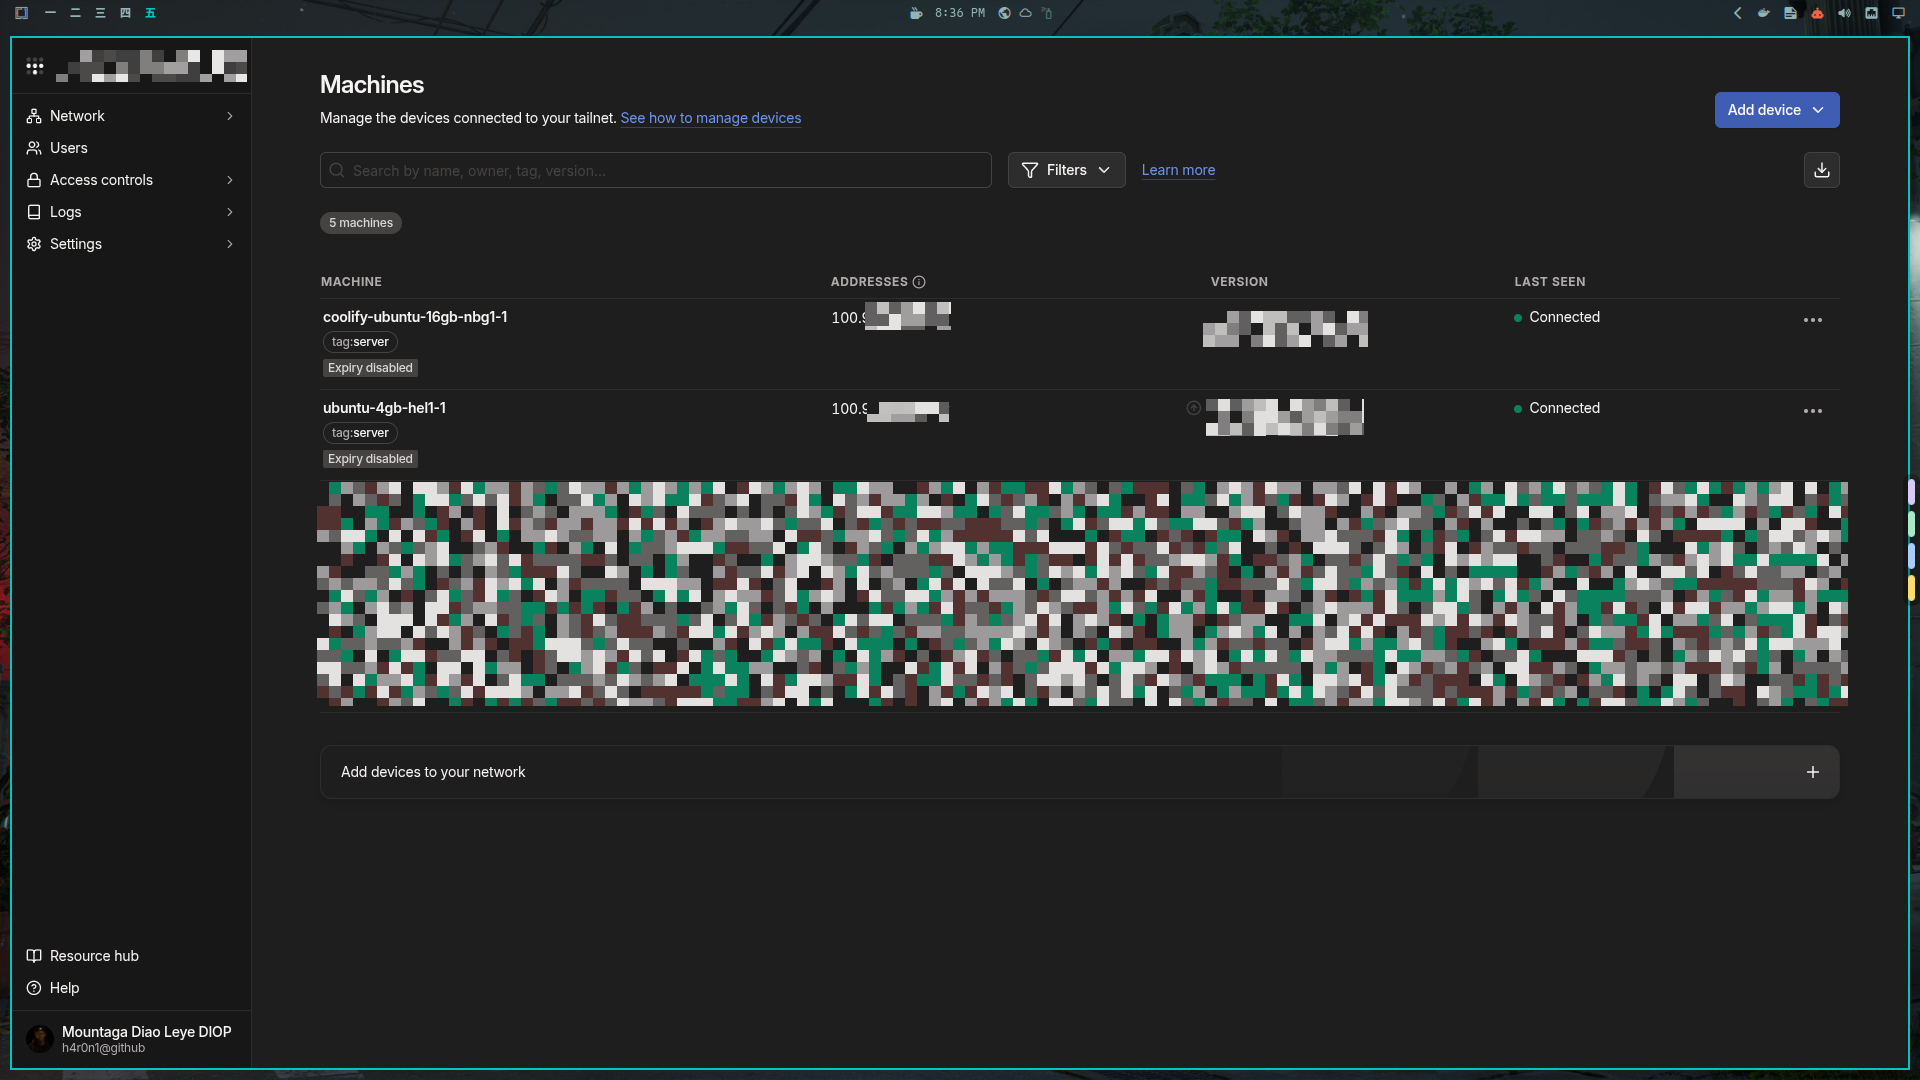
3. Test it from a second terminal. Keep the first session open. In a new terminal, run tailscale status and check that web-1 is listed. Then run ssh your-user@web-1. If you get in, the private path works.
4. Delete the temporary SSH rule. Then check both sides from your laptop:
5. Put your websites behind Cloudflare. Move your domain’s DNS to Cloudflare. Every record that points to your server must show the orange cloud (Proxied). A grey cloud (DNS only) sends visitors straight to your server, skipping Cloudflare, and they’ll hit the closed firewall. Under SSL/TLS, choose Full (strict) so the connection between Cloudflare and your server is encrypted too.

6. Open ports 80 and 443, but only to Cloudflare. Add two TCP rules, one for port 80 and one for 443, with Cloudflare’s addresses as the source. The list is at cloudflare.com/ips; copy both the IPv4 and the IPv6 ranges. It rarely changes, but check it every few months.
7. Let your deploys in too (optional). If GitHub Actions deploys to your server, it has to come through Tailscale as well. The official action joins your private network for one job and leaves when the job ends:
After this step, the job reaches your server on its 100.x address, just like your laptop does. It can run your SSH command or call your deploy webhook. A runner that has just joined can take a few seconds to find the server, so let that command retry.
By default, every device in your Tailscale network can reach every other device. Once CI joins, add an access rule in the Tailscale admin console so tag:ci can reach only your server, and only on the port it deploys through.
Mistakes that undo it
A grey cloud on one record. One forgotten DNS-only record, such as dashboard.example.com, publishes your server’s real address. Once the firewall is closed, that site also stops working. If it’s an admin dashboard (Coolify, Portainer and the like), don’t fix it by opening a port. Delete the record and open the dashboard through Tailscale.
Relying on the server’s own firewall with Docker. Tools like UFW run on the server itself. When Docker publishes a container’s port, its traffic never passes through UFW’s rules, so a database you thought was blocked can be open to the world. The cloud firewall filters traffic before it reaches the machine, so Docker can’t get around it. That’s the main reason to use your provider’s firewall.
Your app now sees Cloudflare, not your visitors. Every request arrives from a Cloudflare address. Cloudflare sends the visitor’s real IP in a header called CF-Connecting-IP. Your framework has to be told to trust Cloudflare’s addresses, and your reverse proxy if you have one. Otherwise your rate limits treat all your visitors as a handful of people. Trust that header only when it comes from Cloudflare, because anyone else who sends it can choose their own IP. The firewall helps here: Cloudflare is now the only caller that can reach your websites.
Two Tailscale accounts. If your laptop signs in with GitHub and the server with Google, you’ve created two private networks that can’t see each other. tailscale ping answers “no matching peer”. Use the same login everywhere.
How to check it worked
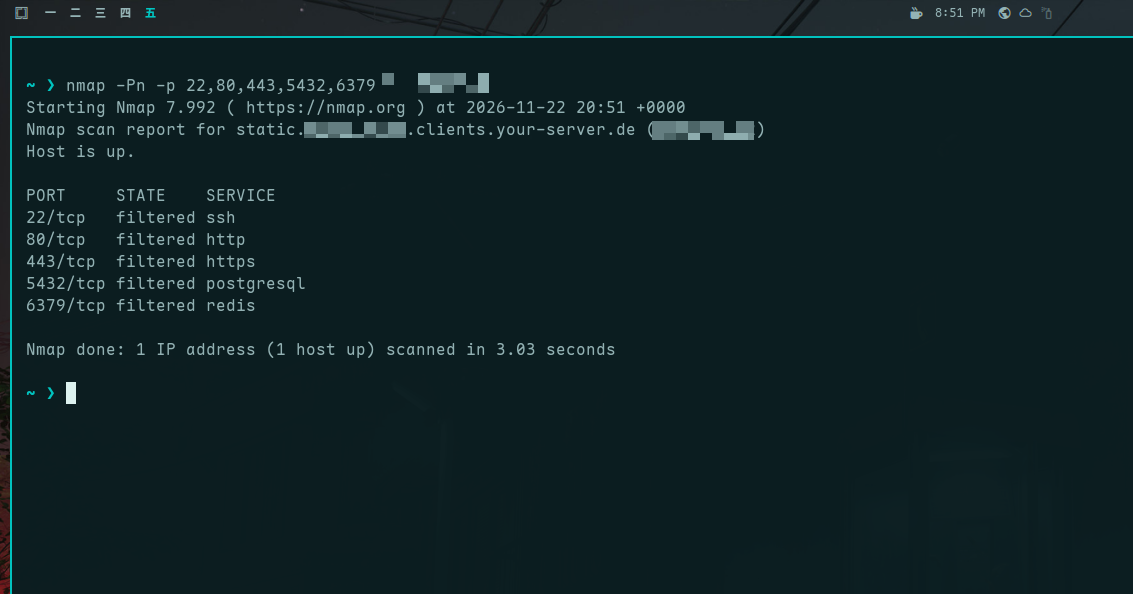
From your laptop, your server’s public address should look switched off:
filtered means the firewall dropped the probe without answering. That’s exactly what the bots see now.
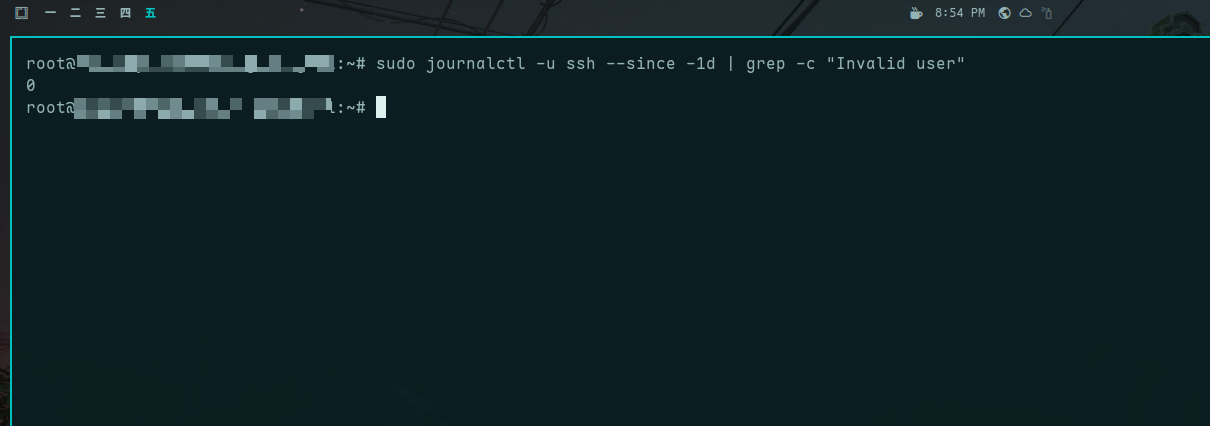
Run the login count from the start of this article again, and it prints zero. The bots haven’t given up. Their knocks just never arrive.
Keep one way in that doesn’t depend on any of this: your provider’s web console and the root password in your password manager. If Tailscale ever stops on the server, that’s how you get back in.
The point
A guest list checks where people are, and it goes stale every time someone moves. This setup removes the doors instead. Your websites have one entrance, run by Cloudflare. Everything else has one entrance too, and it only opens for devices you signed in yourself.
The internet will keep knocking. Make sure nothing answers.